
Strawberry Shortcake: A Balm For Wistfulness
In the summertime, when the weather is fine, your strawberries will be sublime… Crawford Smith is an eclectic cook and musician living in Austin, Texas. Find his unique & inventive home recipes and music videos on crawfordsmith.com.
In the summertime, when the weather is fine…
The coming of the warmer months is making me yearn to return to the setting of my childhood summers: my great-grandfather’s cottage on Bass lake in Ontario.
Norman McLeod, my great-grandfather, built our rickety lakeside cottage in the late 30’s from a kit. It’s constantly falling apart, requiring some kind of intensive maintenance work every visit. It is, nevertheless, quite charming, and my childhood summers were spent canoeing, swimming, and barbecuing in that blissful environment.
Norman himself was by all accounts, a force of nature, and locals still tell stories about him. He was the kind of country doctor who performed surgeries on farmhouse kitchen tables and drove on dirt roads to reach house calls across an entire county. Up until his 70s, he did one headstand a year just to prove he still could. Norman was known to occasionally eat entire bowls of maple syrup with a spoon. His medical school graduation picture hangs in my Grandmother’s study, and Norman’s visage, with fearsome brows and piercing, dark eyes, haunted me as a child.
Time at the cottage was filled with culinary delights. The local bakeries produced many treats that were unique to cottage country or Canada more generally. For breakfast, we would eat tea-cakes or cinnamon-y Chelsea buns with butter and local cream honey, so thick you had to use a knife to spread it. We allowed ourselves to eat dessert with both lunch and dinner when we were at Bass Lake, gorging ourselves on syrupy butter tarts and decadent loaf cakes. Social occasions were accompanied by chocolate-coconut Nanaimo bars, lemon squares, and fig bars.
Summer in that part of Canada was also a magnificent time for the local produce. Wax beans, sweet peas, corn and new potatoes would be simply boiled and served with butter. The tomatoes were at peak season, and black raspberries grew wild on the gravel road the led to the cottage. Usually our visits also coincided with the height of strawberry season. I would eat scores of the tiny, dark, sweet berries, nothing like the pale, unnaturally large California ones available in supermarkets.
My father celebrated strawberry season by making shortcake. The recipes for whipped cream and berries always stayed about the same, but he was constantly fiddling with his shortcake recipe, trying out a new method every time. I have continued his experimentation, with my favorite so far being this recipe:
Strawberry Shortcake
Strawberries
1 quart extremely ripe, in-season strawberries
1/4 cup granulated sugar
Pinch of salt
Cream
3 cups heavy whipping cream
1/2 cup powdered sugar
2 tsp vanilla extract
Pinch of salt
Shortcakes
Approx 1 cup of AP flour
2 tsp baking powder
1/2 tsp baking soda
1/2 tsp salt
1 tsp lemon juice
Cut the greens off your strawberries and slice them root-to-tip into 4 to 8 slices each, depending on size. Sprinkle with the granulated sugar and a pinch of salt and stir until all of the sugar is wet. Leave on the counter for 30 to 45 minutes, stirring occasionally, until all the sugar is completely dissolved and a fair amount of syrup has been produced. Chill until ready to serve. This mixture will keep for a few days in the fridge, although the texture will change.
Reserve a couple tablespoons of your ice-cold heavy cream in a small dish and pour the rest in a bowl with the powdered sugar, vanilla and pinch of salt. Whip by hand or with an electric beater until stiff peaks form. Reserve 4 to 5 cups of the whipped cream in another bowl and put in the fridge. This will also keep for a few days, and can be rewhipped if it starts to deflate.
Mix your flour, baking powder, soda and salt together in a bowl. Add lemon juice to the cup or so of remaining whipped cream and stir gently with a rubber spatula to incorporate. Dump half your flour mixture into the lemon cream, and fold gently with your spatula. Once this is mostly incorporated, fold in the rest of the flour. The goal here to not deflate the cream; be gentle. Adjust the texture of your dough with milk or extra flour as necessary. It should be stiff enough to form with your hands, but wet enough that it feels a little sticky still.
Form your dough with your hands into six biscuit-shaped rounds and place on a greased baking sheet, preferably lined with parchment paper. Place the tray of shortcakes in the freezer or fridge for 15-30 minutes; this will help prevent them from spreading in the oven. Once chilled, brush the tops with the reserved unwhipped cream and sprinkle with a pinch of granulated sugar. Bake at 425 F for 10 to 15 minutes, until the tops are golden brown. Cool for a few minutes before putting together your shortcakes.
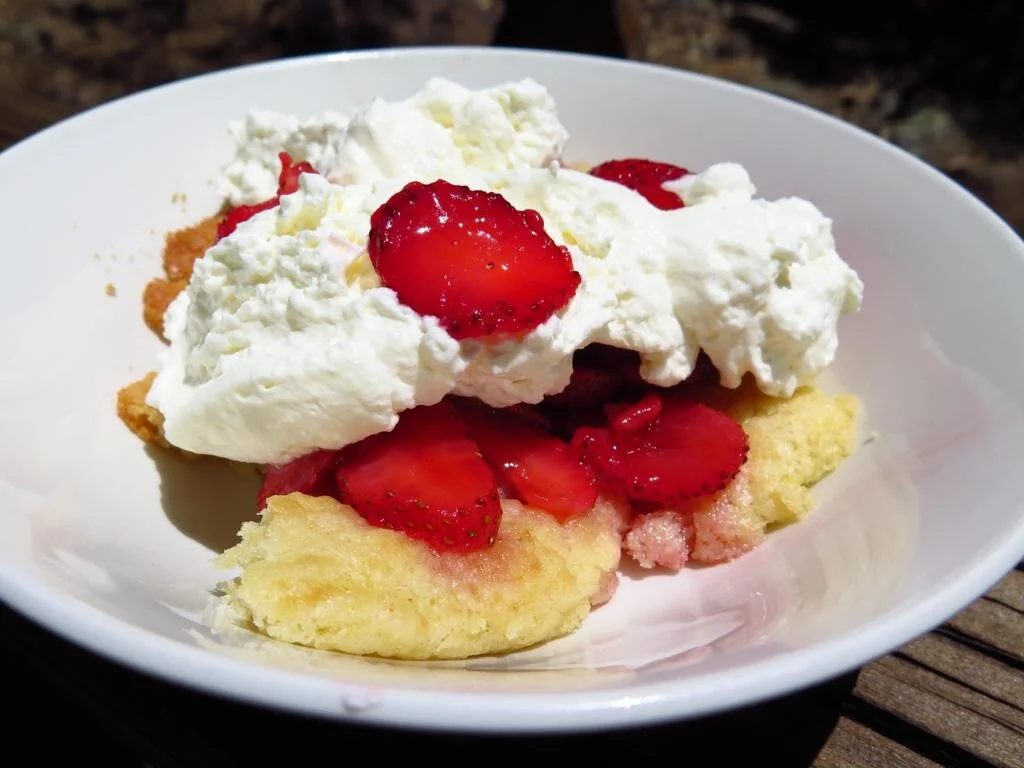
For assembly split the cake in half with a fork and place in a bowl. Top liberally with strawberries and their juices, and cover with an immodest amount of whipped cream. You can add ice cream as well, but I think that gilds the lily.

Tiny Pies For Trying Times
Pies that are truly “easy as pie.” And they fit in your hand like Pop-Tarts! What’s not to love?
The creator of the phrase easy as pie is a goddamn liar.
Making pie filling is easy. Making a pastry crust, rolling it out large enough to cover a pie plate, transporting it from the counter to the pan without breaking it, and making sure the crust and filling finish cooking at the same time still often rewards you with a soggy or tough crust. It’s a bummer.
That’s why I don’t make big pies anymore! I make pop-tarts. Also called hand pies, pocket pies, empanadas, or about a million other things depending on where or when you’re from. In America, at least in modern times, pocket pies are thought of more as a pre-made gas station item than a home-cooked treat. The pies made by the snack cake companies are good, but they’re tooth-achingly sweet, and their crust sucks. We can do better.
You can make pocket pies with any kind of pastry. You can use store-bought pie crust or puff pastry dough, or even probably roll out canned biscuits and use those. I used to make classic butter short crust for my hand pies, but lately I’ve been using a more tender, less crispy dough to better replicate the eating experience of a gas station snack pie.
You can go sweet or savory with these. I have included one example of both genres of filling here.
Hand Pie Crust
Makes 10-ish pies
2.5 cups all-purpose flour
6 tbsp butter, frozen
1 egg
1/4 tsp baking powder
tsp salt
cold water
tbsp vegetable oil
Whisk together flour, salt, and baking powder in a large bowl. Grate the frozen butter on the large side of a box grater and incorporate it into the flour with light tossing motions until it’s evenly combined but the butter is still chunky. Mix in the egg, and then add cold water a tablespoon at a time until you get a dough that juuuust comes together into a ball. Too much water=shitty dough, so make sure you thoroughly mix after each addition of water so you don’t over-hydrate.
Turn your dough out onto a lightly floured board and press into a rough rectangular shape. Wrap in plastic and chill for at least an hour, and up to a couple of days.
When you’re ready to make pie, preheat your oven to 425. Pull your dough rectangle out of the fridge, cut it in half longways, and then cut each half into 5 nuggets. Roll your dough nugs into balls with your hands and roll the balls into disks with a floured rolling pin. I like to go pretty thin, like 1/8th of an inch.

Dough nugs! I used whole wheat flour for all the pies in these pictures, which is why they are brown. White flour will definitely produce tastier results, but I decided if I’m going to be baking at home all the time I might as well gesture towards health a little bit.
Put filling on one half of your dough circle, leaving about a half inch border of bare dough at the edge. Fold your dough over your filling and press the seam together with your fingers, then crimp with a fork.
Either cut slits with a sharp knife in the top of your dough or dock the top by poking a bunch of holes in it with a fork. Rub down each pie with vegetable oil, and bake on parchment lined pans for 20-30 minutes. When done, the edges should be golden brown and all the pastry should feel hard to the touch.

The finished product. The oil rub on the outside produces a nice pseudo-fried exterior.
*Notes*
If you don’t want to roll out each pie individually, you can roll all your dough out at once and cut it into rectangles. Fill and fold the rectangles the same way you would a circle of dough.
You can also totally deep fry these if you want to throw caution to the winds. Fry at 350 in deep oil, turning frequently until both sides are golden brown. Filling can leak out of the pie and cause gnarly splatters so, uh, watch out.
Greens and Feta Pie Filling
This is like a much much easier, slightly less indulgent spanakopita.
one batch of cooked greens
2 cups crumbled feta
2 tbsp lemon juice
salt and pepper, to taste.
Working a handful at a time, squeeze all the juice out of your greens and put the dry greens on a cutting board. Save the juice!! Use it in soup. Chop your greens finely, then add to a bowl and mix with the other ingredients. Go heavy on the seasoning here. The crust will kind of mellow out the flavor of the filling, so you want to season aggressively to compensate. Mound your filling onto a plate and divide into 10 equal portions before you start making your pies.

You can see how the baking powder makes the interior of the crust a little biscuit-y.
Glazed Apple Pies
For the filling:
3-4 green apples, peeled, cored and diced into 1/2 inch pieces
2 tbsp flour
tsp salt
6 tbsp brown sugar
tbsp apple cider vinegar
tsp cinnamon
tsp vanilla
FYI: for sweet pies, I like to mix a couple teaspoons of sugar into my pie dough. Everything else is the same.
Mix everything together in a saucepan on medium heat and cook, stirring constantly, until the apples have softened. If stuff starts sticking to the bottom of the pan, add a little water. When done, your apples should be sitting in a good amount of syrup. Put in a tupperware or similar container and chill until set.
Once cold, you should be able to cut your filling into equal pieces with a butter knife. Construct your pies and bake. Make sure to vent the tops of these well. I didn’t dock mine thoroughly enough, and half of mine exploded. Let them cool, and then add glaze.
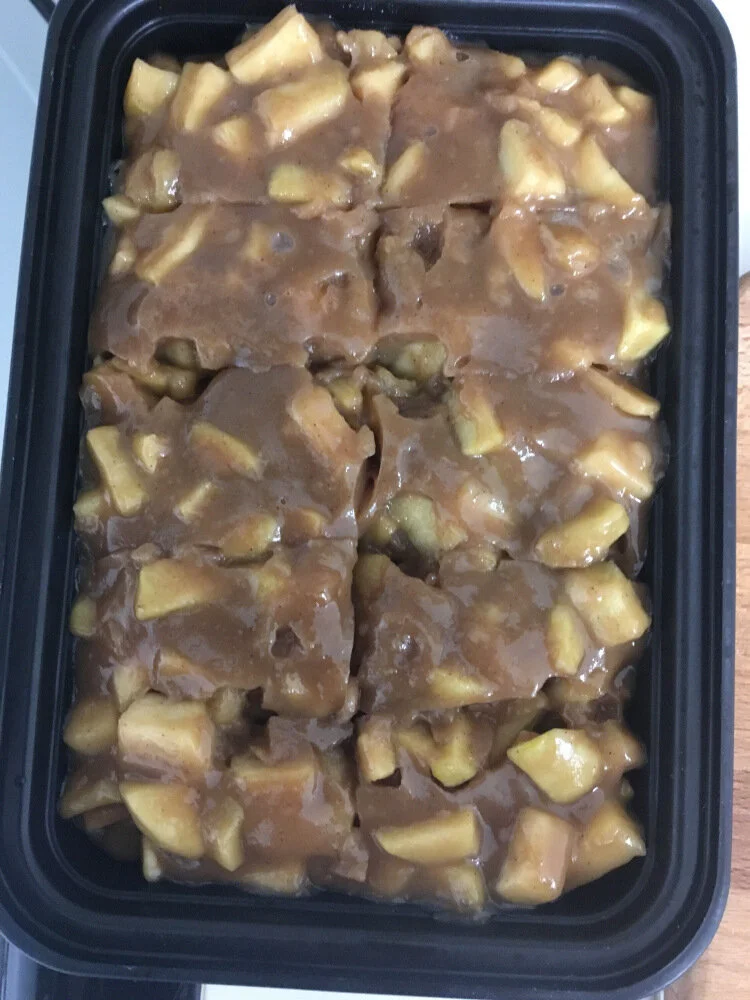
Thoroughly gelled filling cut into portions.
Glaze
3/4 cup powdered sugar
tsp vanilla
1/2 tsp salt
water or milk
Whisk together the first three ingredients, and add just enough liquid to make a frosting that you can pipe. Transfer to a ziploc bag and cut the corner off to use it like a piping bag. Pipe attractive squiggles over the tops of your pies, just like a toaster strudel.

These were for a socially distanced birthday party. Disregard the exploded pie splatter in the left of this image.