
Tiny Pies For Trying Times
Pies that are truly “easy as pie.” And they fit in your hand like Pop-Tarts! What’s not to love?
The creator of the phrase easy as pie is a goddamn liar.
Making pie filling is easy. Making a pastry crust, rolling it out large enough to cover a pie plate, transporting it from the counter to the pan without breaking it, and making sure the crust and filling finish cooking at the same time still often rewards you with a soggy or tough crust. It’s a bummer.
That’s why I don’t make big pies anymore! I make pop-tarts. Also called hand pies, pocket pies, empanadas, or about a million other things depending on where or when you’re from. In America, at least in modern times, pocket pies are thought of more as a pre-made gas station item than a home-cooked treat. The pies made by the snack cake companies are good, but they’re tooth-achingly sweet, and their crust sucks. We can do better.
You can make pocket pies with any kind of pastry. You can use store-bought pie crust or puff pastry dough, or even probably roll out canned biscuits and use those. I used to make classic butter short crust for my hand pies, but lately I’ve been using a more tender, less crispy dough to better replicate the eating experience of a gas station snack pie.
You can go sweet or savory with these. I have included one example of both genres of filling here.
Hand Pie Crust
Makes 10-ish pies
2.5 cups all-purpose flour
6 tbsp butter, frozen
1 egg
1/4 tsp baking powder
tsp salt
cold water
tbsp vegetable oil
Whisk together flour, salt, and baking powder in a large bowl. Grate the frozen butter on the large side of a box grater and incorporate it into the flour with light tossing motions until it’s evenly combined but the butter is still chunky. Mix in the egg, and then add cold water a tablespoon at a time until you get a dough that juuuust comes together into a ball. Too much water=shitty dough, so make sure you thoroughly mix after each addition of water so you don’t over-hydrate.
Turn your dough out onto a lightly floured board and press into a rough rectangular shape. Wrap in plastic and chill for at least an hour, and up to a couple of days.
When you’re ready to make pie, preheat your oven to 425. Pull your dough rectangle out of the fridge, cut it in half longways, and then cut each half into 5 nuggets. Roll your dough nugs into balls with your hands and roll the balls into disks with a floured rolling pin. I like to go pretty thin, like 1/8th of an inch.

Dough nugs! I used whole wheat flour for all the pies in these pictures, which is why they are brown. White flour will definitely produce tastier results, but I decided if I’m going to be baking at home all the time I might as well gesture towards health a little bit.
Put filling on one half of your dough circle, leaving about a half inch border of bare dough at the edge. Fold your dough over your filling and press the seam together with your fingers, then crimp with a fork.
Either cut slits with a sharp knife in the top of your dough or dock the top by poking a bunch of holes in it with a fork. Rub down each pie with vegetable oil, and bake on parchment lined pans for 20-30 minutes. When done, the edges should be golden brown and all the pastry should feel hard to the touch.

The finished product. The oil rub on the outside produces a nice pseudo-fried exterior.
*Notes*
If you don’t want to roll out each pie individually, you can roll all your dough out at once and cut it into rectangles. Fill and fold the rectangles the same way you would a circle of dough.
You can also totally deep fry these if you want to throw caution to the winds. Fry at 350 in deep oil, turning frequently until both sides are golden brown. Filling can leak out of the pie and cause gnarly splatters so, uh, watch out.
Greens and Feta Pie Filling
This is like a much much easier, slightly less indulgent spanakopita.
one batch of cooked greens
2 cups crumbled feta
2 tbsp lemon juice
salt and pepper, to taste.
Working a handful at a time, squeeze all the juice out of your greens and put the dry greens on a cutting board. Save the juice!! Use it in soup. Chop your greens finely, then add to a bowl and mix with the other ingredients. Go heavy on the seasoning here. The crust will kind of mellow out the flavor of the filling, so you want to season aggressively to compensate. Mound your filling onto a plate and divide into 10 equal portions before you start making your pies.

You can see how the baking powder makes the interior of the crust a little biscuit-y.
Glazed Apple Pies
For the filling:
3-4 green apples, peeled, cored and diced into 1/2 inch pieces
2 tbsp flour
tsp salt
6 tbsp brown sugar
tbsp apple cider vinegar
tsp cinnamon
tsp vanilla
FYI: for sweet pies, I like to mix a couple teaspoons of sugar into my pie dough. Everything else is the same.
Mix everything together in a saucepan on medium heat and cook, stirring constantly, until the apples have softened. If stuff starts sticking to the bottom of the pan, add a little water. When done, your apples should be sitting in a good amount of syrup. Put in a tupperware or similar container and chill until set.
Once cold, you should be able to cut your filling into equal pieces with a butter knife. Construct your pies and bake. Make sure to vent the tops of these well. I didn’t dock mine thoroughly enough, and half of mine exploded. Let them cool, and then add glaze.
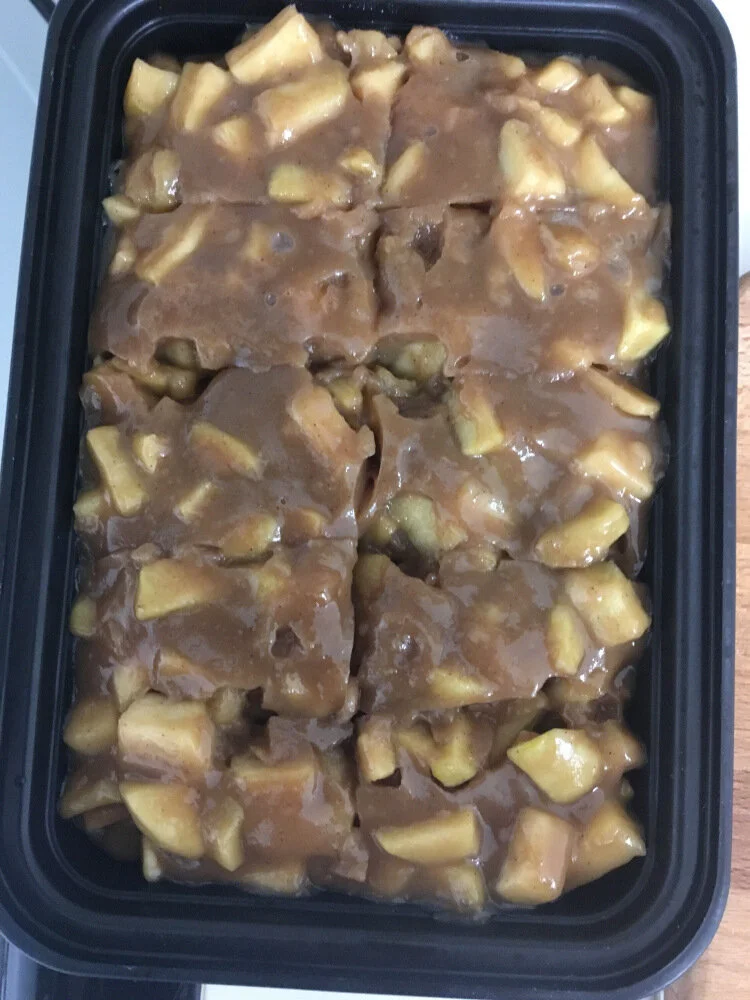
Thoroughly gelled filling cut into portions.
Glaze
3/4 cup powdered sugar
tsp vanilla
1/2 tsp salt
water or milk
Whisk together the first three ingredients, and add just enough liquid to make a frosting that you can pipe. Transfer to a ziploc bag and cut the corner off to use it like a piping bag. Pipe attractive squiggles over the tops of your pies, just like a toaster strudel.

These were for a socially distanced birthday party. Disregard the exploded pie splatter in the left of this image.
Apples And Dough, Two Ways
If you bake with apples, you can eat dessert for breakfast without people getting all judgmental.
If my social media feeds are any indication, folks out there are doing a lot of stress baking right now. I’m in the nervous dessert club too. My stress has been doubled by the fact that I’ve been working from one dwindling bag of flour, unable to locate a replacement on the barren shelves of my local grocers. Thankfully, I was able to score a bag on my latest trip, so I can continue treating my gnawing anxiety with pastry.
Before that miraculous find, I was stretching my flour by making flour-light desserts like pudding and souffle. When I did make dough, I used it as a topper for large quantities of things that were not dough. One of the things I was able to score from the walk-in at Apple on the day I got laid off was a boatload of Fuji apples. I made a simple apple filling and baked two different confections with it: cobbler and coffeecake. Both filled the hole in my stomach that used to be filled with my confidence that the world around me would act basically normally and in line with my historical assumptions.
I stole some techniques from Rick Bragg’s delightful book about his mother, “The Greatest Cook in the World.” Not a traditional cookbook, this work interweaves a biography of the author’s mother with the recipes she cooked for him growing up. I found these recipes truly inspiring. Some of them are centuries-old family heirlooms that I’ve never seen before in any source on “Southern” food. The book is an incredible resource for vernacular cooking of the American South, and I can’t recommend it enough. Mama Bragg’s recipes include pages and pages of careful, homey instruction; the pinto bean recipe, for instance, has three ingredients and three pages of philosophical musings on bean cookery. I took the ideas for macerating the fruit before baking and using a lattice top on the cobbler from Mrs. Bragg.
Anyway, here’s 2 recipes:
Apple Filling
4 medium-size apples
1/4 cup brown sugar
tsp salt
tsp cinnamon
1.5 tsp grated or minced fresh ginger
2 tsp lemon juice or apple cider vinegar
tbsp flour
tsp vanilla extract
Chop the apples in your desired shape and mix with the other ingredients. The size of your pieces depends on the end texture you want. I like my apples cooked soft in desserts, so I cut mine in little baby slices. Let this hang out for at least a couple hours or up to a couple days in the fridge so the flavors can marry and the apples can release their juices.

Mmmmm, wet apple chips
Cobbler
1 cup flour
3 tbsp butter, ice cold
yogurt or buttermilk or milk mixed with a little lemon juice/vinegar
2 tsp baking powder
1 tsp baking soda
tbsp white sugar
1/2 tsp salt
egg wash (optional)
flaky sea salt and/or turbinado sugar (optional)
Preheat your oven to 375F. Mix together flour, white sugar, baking powder, soda, and salt. Dice your butter into teeny little pieces and cut into the flour using your fingertips or two forks. Your desired end texture here is tiny chunks of butter evenly distributed and coated in flour. Add your yogurt or whatever a couple tablespoons at a time, mixing until you have a dough that’s dry enough to roll out without making a huge mess but wet enough not to break apart. Don’t overmix!

This is your desired texture, pretty dry, just a little bit wetter than pie dough. You can see visible chunks of butter still. You want that.
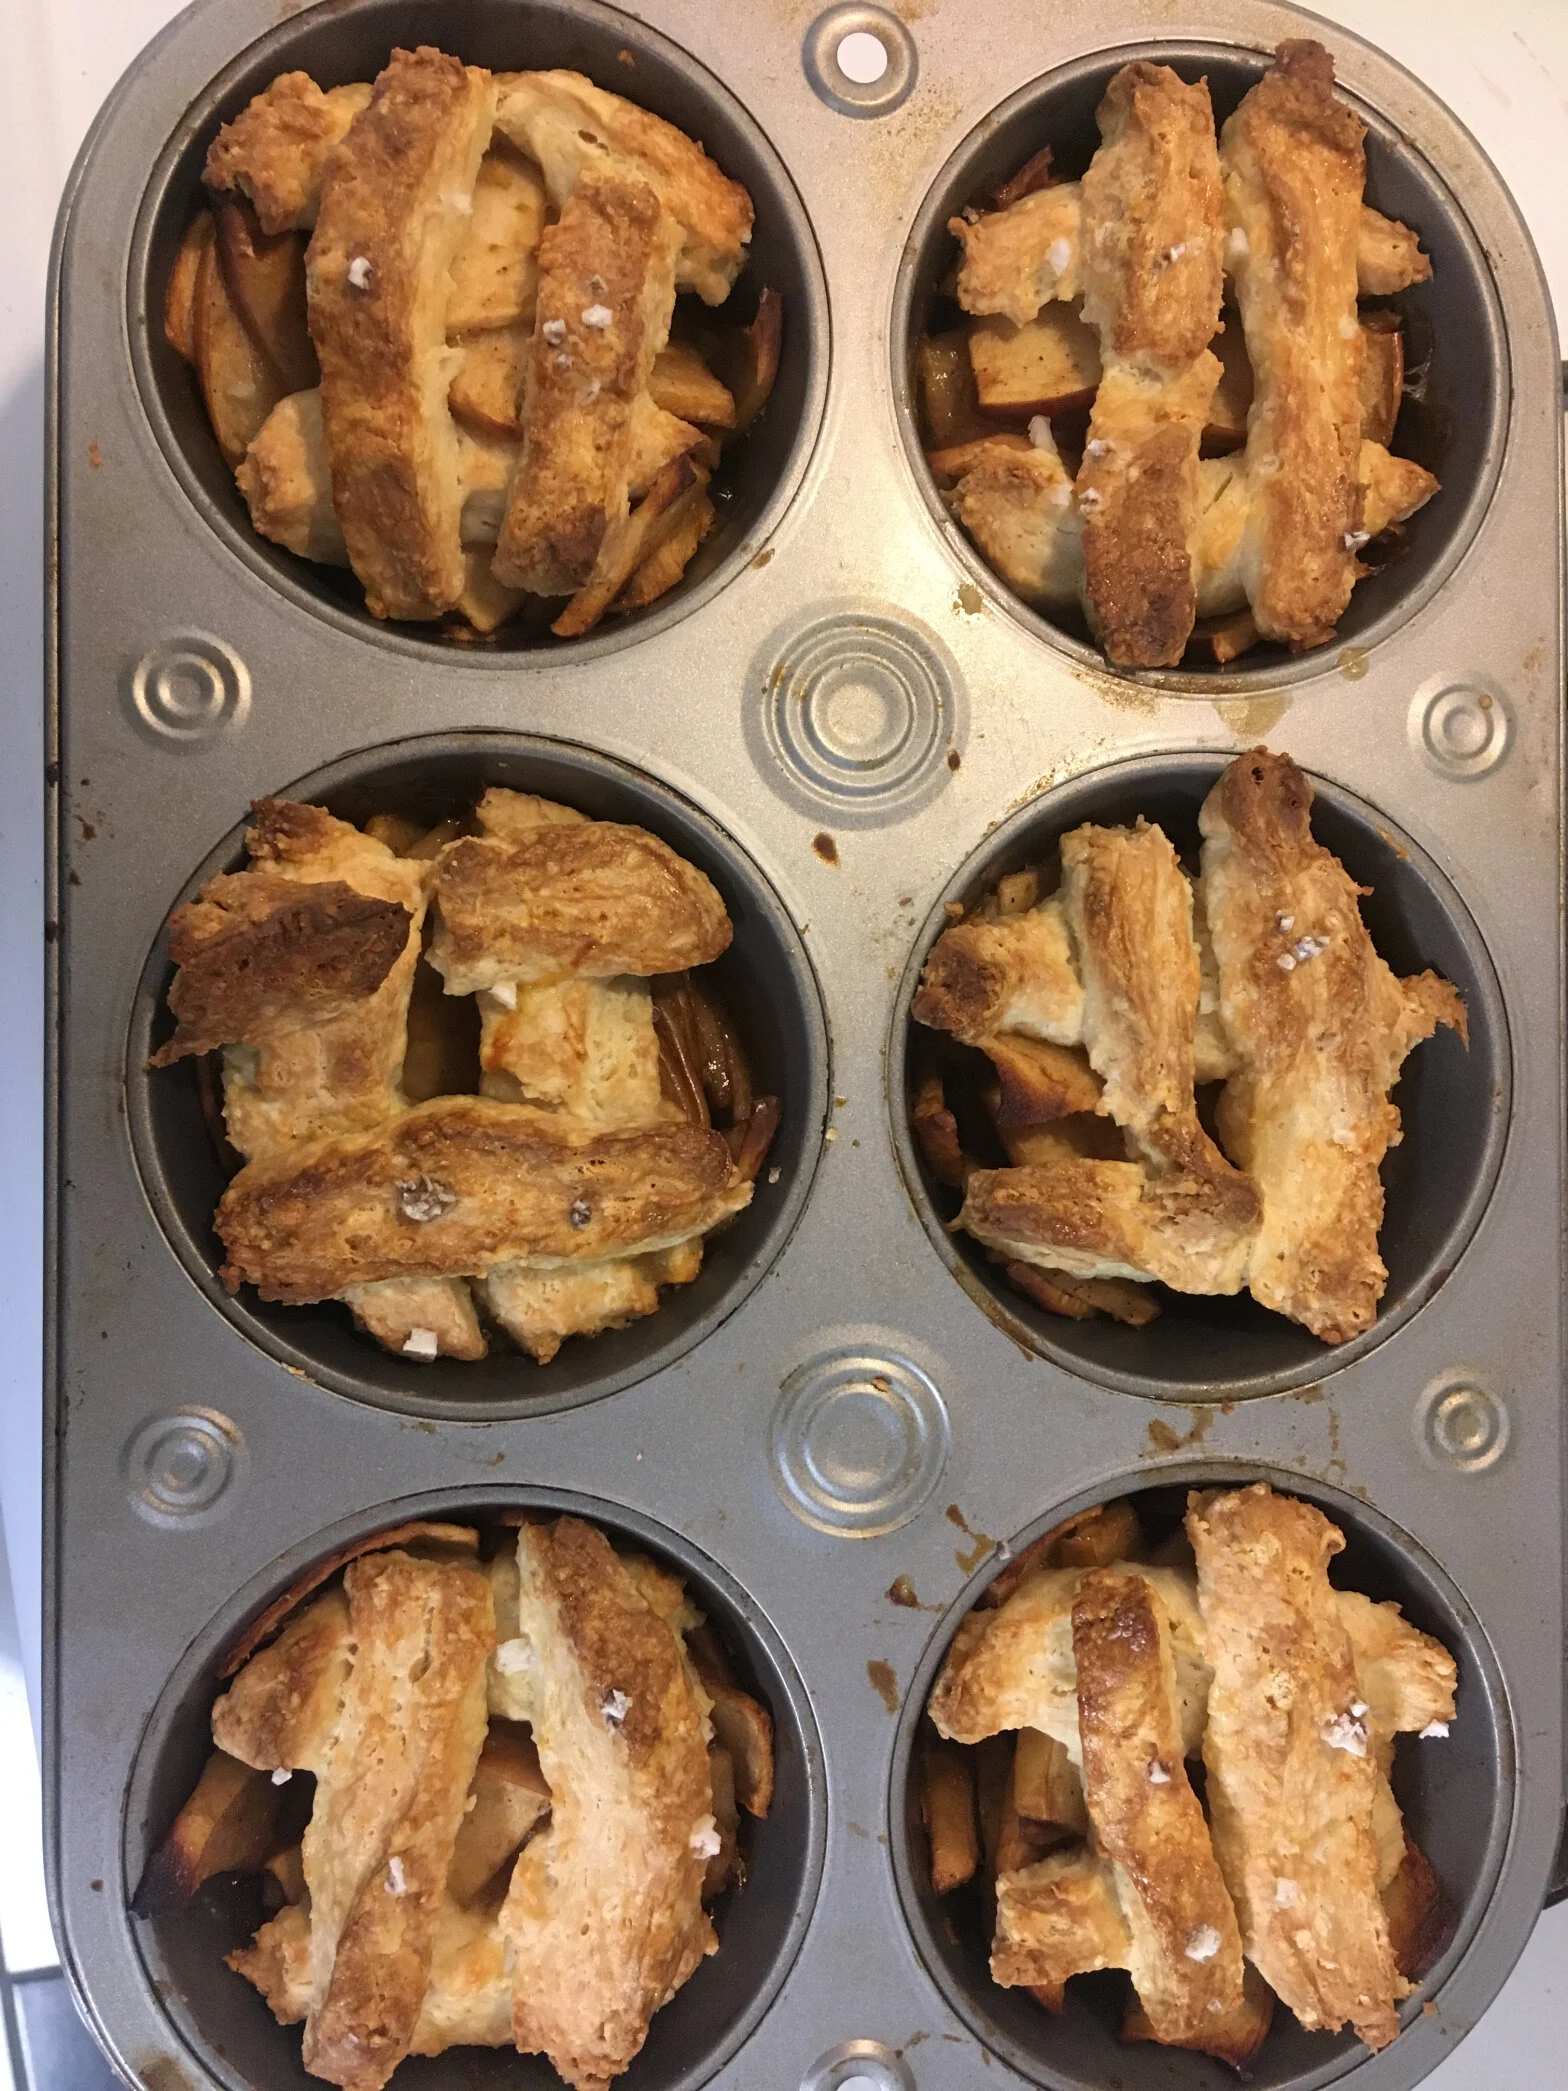
Roll out your dough on a floured surface to about 1/4 inch thick and cut it into little strips. This makes enough dough to cover about 3/4 of your apple mixture. Save the rest for coffee cake! Spoon your apple mixture into the greased baking vessel of your choice (I went with a muffin tin for maximum crispy edges, as per Kristen’s request). Arrange your strips of dough in a criss-cross pattern on top of the apple mixture. If you’re feeling enterprising, brush the top of your dough with beaten egg and scatter some coarse sea salt or turbinado sugar over the top.

Don’t be like me. Use a big boy knife to cut your strips.

You can tell I’m primarily a savory cook because my lattice top looks like trash.
Bake until the top is golden brown and delicious and your dough is cooked all the way through. I think I started checking after about half an hour.

I went with pretzel salt for the top
This cobbler has a lot less sugar than most recipes do. I highly suggest serving with vanilla ice cream or caramel sauce, or both.
Coffee Cake
For the batter:
3 tbsp melted butter
3 tbsp white sugar
3/4 cup flour
1.5 tsp baking powder
sour cream or yogurt
tsp salt
1 egg
1 tsp vanilla extra
For the crunchy topping
1.5 tbsp butter, softened
2 tsp semolina or flour
2 tbsp oatmeal
3 tbsp brown sugar
1/2 tsp salt
Preheat your oven to 350F. Spread your remaining apple mixture (about 1 apple’s worth) in the bottom of a very well-greased small loaf pan or baking dish (you could also do this as muffins, I won’t stop you). Mix together all the batter ingredients except the yogurt/sour cream, then add enough of that in to make a batter that’s juuuuuuust pourable. Think slightly thicker than pancake batter. Don’t overmix this either! Spread your batter over your apple mixture. Mush together the topping ingredients with a fork or your fingers and scatter this on top of your batter. Bake for around half an hour probably, but start checking after 20 minutes. Could be longer than half an hour too. Never trust any baking recipe’s exact times. You’ll know it’s done when a knife or toothpick inserted into the middle comes out mostly clean.

I didn’t take any process pics for this one, but it’s mostly a mix-and-dump kind of thing. If you’ve ever made pancakes or a cake from a boxed mix, you should be able to handle this.